
For a description of orthographic drawing I am going to use a house as an example.
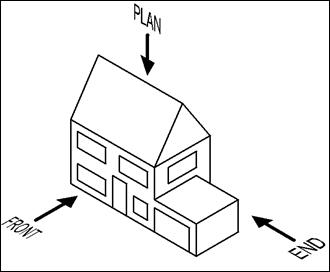 Hopefully you will all recognise that the house above has been drawn in 3-D or orthographic.
I have labelled the direction, or view, that looks towards the front of the house. The end view that I have labelled is the right-hand end. The view from the top is called the plan.
In orthographic drawing you only need to draw as many views as are necessary to describe the object.
For this house, then, if I were an architect I would need to show the left-hand view and the back of the house too.
Most objects are symmetrical in some way, however, so you don’t always need to show all the views.
For example, a chair almost always has symmetrical sides. A bottle is not only symmetrical left and right, but also front and back.
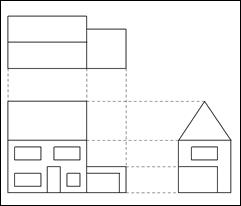 There is a strict, but logical pattern for arranging the views on a sheet of paper. Start by drawing the front view, and then to the right of it the right-hand end view. Draw the plan view above the front view.
The dotted lines show how you can keep your views in alignment with each other. You can draw them in to help you put together your orthographic drawing but make sure you erase them at the end.
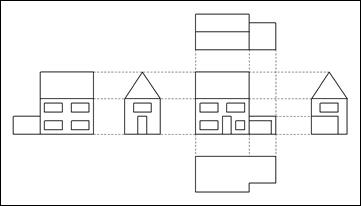
As I said earlier, these three views are usually enough. In the space below I have shown how you can include left-hand end, back and also base views.
 The next thing that you need to know about for orthographic drawing is scale. You need to pick a scale that will make the best use of the space on your sheet of paper. If I was to draw a house full-size (1:1) on a sheet of A3 paper, there would barely be enough space to draw one brick! I need to pick a scale that allows me to get all of the views of the house into the available space.
If I picked a scale of 1:2, this would mean that every 1cm on the page equals 2cm in real life. This still wouldn’t be small enough to fit in a whole house! I would probably need to use a scale of 1:100 or 1:200.
On your drawing you must state which scale you are using.
If you were drawing something particularly small and detailed (an item of jewellery, for example), you can make the drawing bigger than the actual object. To draw something twice its normal size, you would use a scale of 2:1 and double all of the actual measurements.
Even now the drawing is missing one key feature and that is measurements or dimensions. These are almost always given in millimetres (mm). If you were drawing something particularly large, however, you might use the next unit up which is metres (m).
There are strict rules for applying dimensions onto a drawing and once again, one of the key rules is don’t put any more dimensions on a drawing than are strictly necessary.
Orthographic Drawing
I have shown below how to apply dimensions to a drawing.
There are several things to note about this drawing. Firstly, that putting dimensions on a drawing will often make it more difficult to ‘read’; this is why it important to keep dimensions to a minimum.
 The lines that lead away from the object are thinner than the lines of the object itself and the arrow is neatly tapered.
Where there is unlikely to be sufficient space to include the arrow and the dimension, the arrow is drawn from the outside pointing in (look at the 15mm dimension).
 The dimension lines showing the radius/diameter of curves and holes points towards the centres of those features.
A hole and/or a curve needs to have at least 3 different dimensions. You need know;
The dimensions that you write on your drawings are the dimensions of the object in real life, not the dimensions of the drawing on the paper.
The methods I have discussed will allow you to produce a reasonably convincing 3rd Angle Orthographic drawing. This is a quick reminder of the rules:
 In the space below I will show you some advanced elements of orthographic drawing.
I have picked, as an example, the humble pencil sharpener.
A simple orthographic drawing for this would look like this.
The problem with this is that it doesn’t allow us to see the clearly the ridge at the top of the sharpener or the fact that the hole is tapered.
For that we need a section view.
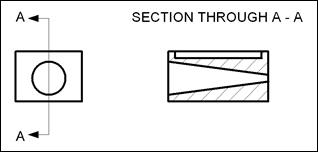
The strange arrow labelled ‘A’ at both ends is called a section line. This is an imaginary line along which you are splitting the object.
Next to it is the section view which shows what the object would look like if it were split along the line. The area with the diagonal lines (known as hatching) is the solid area that would be affected by cutting the shape in half.
Source: http://www.thedesignline.co.uk/dtgcse/html/documents/orthographicdrawing.doc
Web site to visit: http://www.thedesignline.co.uk/
Author of the text: indicated on the source document of the above text
If you are the author of the text above and you not agree to share your knowledge for teaching, research, scholarship (for fair use as indicated in the United States copyrigh low) please send us an e-mail and we will remove your text quickly. Fair use is a limitation and exception to the exclusive right granted by copyright law to the author of a creative work. In United States copyright law, fair use is a doctrine that permits limited use of copyrighted material without acquiring permission from the rights holders. Examples of fair use include commentary, search engines, criticism, news reporting, research, teaching, library archiving and scholarship. It provides for the legal, unlicensed citation or incorporation of copyrighted material in another author's work under a four-factor balancing test. (source: http://en.wikipedia.org/wiki/Fair_use)
The information of medicine and health contained in the site are of a general nature and purpose which is purely informative and for this reason may not replace in any case, the council of a doctor or a qualified entity legally to the profession.
The texts are the property of their respective authors and we thank them for giving us the opportunity to share for free to students, teachers and users of the Web their texts will used only for illustrative educational and scientific purposes only.
All the information in our site are given for nonprofit educational purposes