
The portable machine tools identified and described in this chapter are intended for use by maintenance personnel in a shop or field environment. These lightweight, transportable machine tools, can quickly and easily be moved to the workplace to accomplish machining operations. The accuracy of work performed by portable machine tools is dependent upon the user's skill and experience.
Portable machine tools are powered by self-contained electric motors or compressed air (pneumatic) from an outside source. They are classified as either cutting tools (straight and angle hand drills, metal sawing machines, and metal cutting shears) or finishing tools (sanders, grinders, and polishers).
Portable machine tools require special safety precautions while being used. These are in addition to those safety precautions described in Chapter 1.
Here are some safety precautions to follow:
Use the right wire gage for the length of the cord. As the length of the extension cord increases, heavier gage wire must be used. Lengthening extension cords by connecting several small gage cords together causes a serious drop in voltage. This results in the cord overheating. Extension cords that overheat will burn away the insulation, creating a potential electric shock hazard and fire hazard. See Table 3-1, Appendix A, for proper gage and length of extension cords.

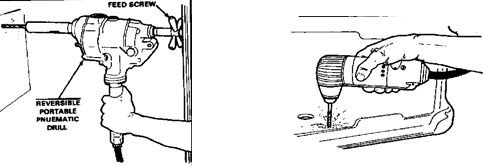
The portable drill is a hand-supported, power-driven machine tool that rotates twist drills, reamers, counterbores, and similar cutting tools. The portable drill may be electrically powered by means of an internal electric motor (Figure 3-1) or may be pneumatically powered (Figure 3-2). Portable drills are rated by the maximum size hole that can be drilled in steel without overtaxing the motor or drill.
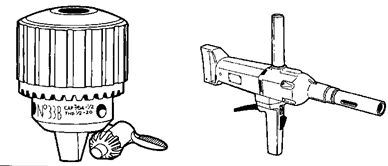
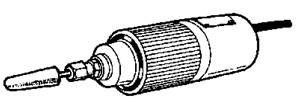
Therefore, a 1/4-inch-capacity drill is capable of drilling a 1/4-inch diameter hole or smaller in steel. Portable electric and pneumatic drills rated at 1/4 to 1/2-inch maximum capacities are usually equipped with geared drill chucks for mounting straight, round shank twist drills or other similar tools by using a chuck key (Figure 3-3). Heavier portable drills (Figure 3-4) having a 3/4-to 1 1/4-inch capacity use taper shank chucks to mount drills and other similar tools.
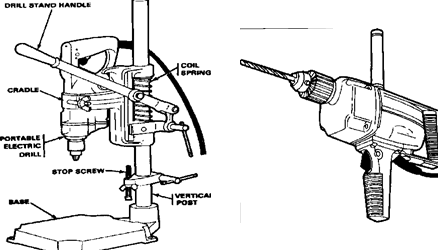
Portable drills have many different characteristics (Figure 3-5) depending on how the job is to be done. They may be set for one speed or they may be variable speed drills. A variable speed drill is an excellent tool for use as a power screwdriver. Portable drills may be equipped with a reversing switch to allow a screwdriver attachment to reverse bolts and screws out of holes. Special 90° angle portable drills (Figure 3-8) are available for drilling in confined spaces where a standard size drill will not have sufficient clearance. For corners and tight spots, a 360° angle portable pneumatic drill (Figure 3-2) is available which can be swiveled to any desired angle and locked into position. Most portable drills have a lock button near the on-off switch which allows for continuous operation without holding the trigger. Side handles and rear spade handles (Figure 3-5) can be attached to most drills to stabilize drilling and to allow for better control. Special devices, such as a vertical stand (Figure 3-6) or feed screw (Figure 3-7), can be used on some of the portable drills to make a job easier or more proficient.
The size, type, and power capacity of portable drills selected depends on the job to be performed. Before attempting a drilling job, check the capabilities of the portable drill with the manufacturer's instruction manual.
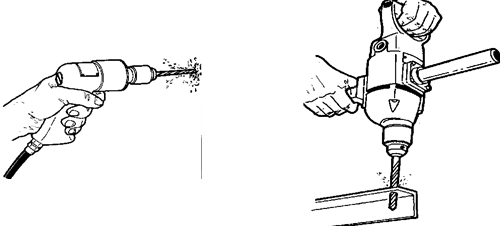
Operation of the portable electric and pneumatic drills differs from recommended operating procedures for the upright drilling machine. The portable drill is hand supported for most operations, and the cutting speed of the drill is fixed or dependent upon the operator to control. When hand supported, the drill must be carefully aligned with the workpiece (Figure 3-9) and this alignment must be maintained throughout the drilling operation. Care must be taken not to lose control of the portable drill and allow it to be wrenched from the operator's hands. The larger portable drills (Figure 3-10) can be very dangerous if not held firmly by the operator. If the cutting speed is fixed, the operator must learn to control the feed of the portable drill by applying sufficient pressure for the drill to cut, but not too much pressure as to cause overheating of the twist drill or stalling of the portable drill motor.
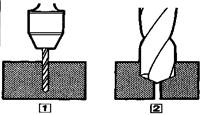
When metal is to be drilled with the portable drill, the workpiece must be prepared by locating the center position of the potential hole and marking the location with a center punch. When a large drill is to be used, it will be necessary first to drill a pilot hole slightly larger in diameter than the thickness of the larger drill's web, which will allow for the drag caused by the larger drill's chisel edge (Figure 3-11).
Portable pneumatic drills require special attention to lubricate their internal moving parts. Each drill may be made slightly different, so refer to the pertinent lubrication order or manufacturer's instruction manual before drilling.
For drilling by hand, the workpiece must be mounted securely. Thin workpieces should be backed up with a thicker piece of wood or metal to prevent the drill from snagging in the workpiece. Do not attempt to hold any workpiece by hand or serious injury could result.
Select a twist drill of the proper size for the hole to be drilled. Ensure that the twist drill selected has the right type of shank for the type of chuck mounted on the portable drill. Taper shank drills cannot be mounted in a drill with a geared chuck. Check each twist drill for sharp cutting edges prior to use.
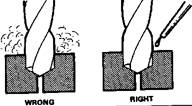
After securing the twist drill in the proper chuck, connect the portable drill to its power source. Position the portable drill perpendicular to the workpiece and center the chisel point of the drill in the center-punched hole of the workpiece. Apply firm but not too heavy pressure upon the portable drill, pull the trigger or throttle button to start the drill.
Apply a few drops of cutting oil to the twist drill and hole (Figure 3-12) to improve the cutting action and prevent overheating of the twist drill. For long drilling operations, stop the drill and allow it to cool; then apply additional cutting oil to the drilling area. The lock button can be engaged for lengthy cutting operations.
Continue drilling the hole while applying enough pressure to produce a clean chip, but not so much pressure as to cause the motor to strain or the drill to bind. The drill must be held firmly at all times to prevent the drill from being wrenched from the hands of the operator if the flutes of the drill should snag on a metal burr in the hole.
As the twist drill nears the back wall of the workpiece, release the lock button so that the drill can be stopped immediately if required. Decrease the feed pressure as the drill breaks through, and cautiously feed the drill through the wall of the workpiece. If the drill should snag on a burr, stop drilling immediately and withdraw from the hole. Carefully feed the drill back into the hole while the drill is turning to cut through the burr.
When a portable drill is mounted to a vertical stand, the operating procedure is identical to that used for the upright drilling machine. Use the lock button while drilling and use the hand lever to drill to the required depth.
Portable drilling operations can be difficult to an inexperienced operator. It is difficult to keep the twist drill perpendicular to the workpiece during drilling, and it is hard to drill to a desired depth accurately. If help is available, use the buddy system to keep the drill aligned while drilling. To drill to depth, mark the twist drill with a light colored marking pen or a strip of tape and keep a close watch on the drill as it cuts. Another way to drill to depth accurately using the portable drill is to use a jig, such as a piece of metal pipe or tubing cut to length, to indicate when the drill has reached the desired depth.
The portable grinder is a lightweight, hand-operated machine tool. It can be powered electrically or pneumatically, depending on the model selected. The portable grinder is used in the field or maintenance shop to grind excess metal from welds, remove rust, and for special finishing operations around the work area. Since this tool is hand operated, the quality of the work depends upon the ability and experience of the operator.
A small portable chuck type grinder may be known as a die grinder and is available with a number of accessories.
These accessories include rotary files, small circular saws, wire brushes, assorted grinding wheels, and small sanding and polishing disks. These accessories are mounted to straight shank arbors which fit into the collet chuck of the grinder. Special reduction collets are provided so that smaller diameter arbors or shanks can be mounted in the chuck. Operations performed with this portable grinder include shaping and smoothing intricate dies and castings, removing burrs from edges and surfaces, cleaning and repairing threaded parts, repairing keyways and splines, grinding bevels, countersinking holes. and repairing scored and mutilated surfaces.
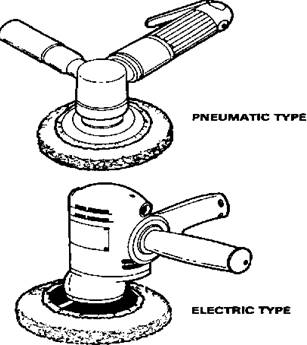
The portable grinder (wheel type) (Figure 3-14) can be electric or pneumatic and is designed for heavy-duty portable grinding operations. It is capable of mounting and rotating 6-inch-diameter grinding abrasive wheels and 6-inch-diameter wire brushes and polishing wheels. This grinder is used as a hand grinder for removing rust, corrosion, and sharp burrs from large workpieces (Figure 3-15).

Most portable grinders come with a grinder stand (Figure 3-16). Mounted on this stand, the grinder can be used to sharpen twist drills and cutter bits in the machine shop. Most grinders also come equipped with a wheel guard that should remain in place at all times to protect the operator from flying sparks and waste material. The portable grinder is designed so that the face of the grinding wheel is used; never use the side of the wheel or serious injury or damage could occur (Figure 3-17).
The angle grinder (disk type) (Figure 3-18) can be electric or pneumatic, and is designed for heavy duty grinding operations. The angle grinder consists of a depressed center abrasive grinding disk with wheel guard attached to the basic portable motor assembly (Figure 3-19). Care must be taken to check the wheel for cracks and to ensure that the wheel guard stays in place while operating.
Before operating any portable grinder, check the grinding wheel for cracks and check that the arbor hole is the proper size for the grinder to be used. When operating these grinders, keep a light pressure on the work to avoid damaging the wheel or overheating the workpiece.
Both the small and the larger portable grinders operate at a high speed, so avoid letting the wheel rest on one spot for too long. This could cause the work to burn or the wheel to crack and explode. Always check the manufacturer's instruction. manual before operation to ensure the grinding wheel's maximum rated speed is rated higher than the maximum speed of the grinder.
When grinding, buffing, or polishing with any portable grinder, always keep a firm grip on the tool to avoid injury or damage to equipment
Portable sanders and polishers are used for surface finishing of materials such as metal, wood, ceramics, and plastics. Both tools are lightweight and fairly easy to operate. They can be powered electrically or pneumatically and can be light-duty or heavy duty.
Portable sanders are used to remove paint, rust, corrosion, and imperfections from the surface of workpieces to produce a smooth surface for finishing. Field and machine shop maintenance personnel use the disk-type portable sander (Figure 3-20). The disk-type portable sander has a high-speed motor that rotates an abrasive disk, wire wheel, or a grinding wheel to prepare a surface for finishing. For sanding, a disk of abrasive paper is mounted with a flexible backing pad on the motor spindle (Figure 3-21). The basic motor unit is similar to the motor unit used for angle grinding, but with sanding there is no need for a wheel guard. On some models the motor spindle can be locked by depressing a lock button to install or remove the sanding disks. A side handle on the motor housing is used to support the sander during operation. This handle can be removed and screwed into the opposite side of the motor housing for left-handed operation. Pneumatic sanders have an advantage over electric sanders because they are lighter in weight and easier to handle which usually produces a better finished product.
NOTE: Portable sanders are not intended for use as portable abrasive cutoff saws. The torque for cut off sawing will ruin the soft gearing in the sander motor unit.
Various abrasive disks are used in the operation of the portable electric sander. These disks consist of different abrasive grains that have been bonded or glued onto a cloth or paper disk (see Table 3-2) in Appendix A..
The backing material that supports the abrasive disk is made of a tough vulcanized rubber or fiber that can withstand hard use and constant flexing. Normally, the abrasive grain used on the disk is aluminum oxide, and the bonding agent is glue or special resin. Abrasive disks come in open-coat or closed-coat types, depending on the work to be performed. The closed-coat disk has the abrasive grains bonded close together, while the open-coat disk has the abrasive grains spaced further apart. Open-coat abrasive disks are used for sanding soft materials that could possibly load up a closed-coat disk, for example, wood sanding, removing paint and rust, and plastic. Closed-coat abrasive disks are used for sanding metal, finishing ceramics, and for smoothing rougher sanded areas.
Most portable sanders come with an instruction manual and those accessories that the manufacturer recommends for its use. These accessories can include a sanding setup which includes a flexible rubber backing plate, several types of sanding disks, and the hardware to secure the disk to the motor assembly. Other accessories may include flexible grinding disks with wheel guards, wire wheels, and odd-shaped grinding cups with the appropriate wheel guard. Only use accessories approved by the manufacturer to avoid injury or damage to equipment.
The portable polisher (Figure 3-22) is used to produce a super finish or shine to the workpiece surface. Polishing or buffing a surface is desirable at times to increase smoothness and make the surface easier to clean. By polishing a surface, a workpiece can also be made more wear resistant. Portable polishers are generally more powerful than portable sanders
Since they encounter a greater frictional resistance when in operation, portable polishers operate at slower speeds than portable sanders so as not to mar the finished surface. Pneumatic portable polishers are lighter in weight than electric models and may make fewer buffing marks on the finish. In order to improve the surface quality of a workpiece through polishing, it is necessary to use a soft bonnet or cover over the sander backing pad.
Lamb's wool polishing bonnets are recommended with a soft rubber cushion pad separating the bonnet and the backing pad. Polishing compound, which is a mild abrasive, is used to help polish the surface. A left-or right-handed side handle is attached to the motor housing to help control the polisher during operations.
Operating the portable sander is difficult due to the rotating force of the disk, so the quality of the work depends mostly on the experience of the machine operator. Hold the portable sander so that the abrasive disk forms an angle of approximately 15° to the workpiece surface (Figure 3-23). Apply just enough pressure against the sander to bend the sanding pad and abrasive disk so that about 2 inches of the disk contact the surface. Move the sander from side to side, overlapping each path with the next. If the sander cuts irregularly or is hard to control, the sander is most likely at an angle less than the required 15° to the workpiece. If the sander gouges or leaves rough edges, the angle formed by the sander is most likely too great. When the sander is operating, keep it moving back and forth across the workpiece or lift it free to avoid damaging the surface.
The portable polisher looks like the portable sander but it is built with a slower speed and high torque needed for polishing. Polishing is performed by placing the spinning lamb's wool polishing bonnet lightly against the workpiece and moving the polisher lightly back and forth while maintaining a light pressure on the workpiece. Avoid pressing down too hard, or the surface could get damaged. Use separate polishing bonnets for different polishing abrasives, glazes, or waxes. Reapply polishing compound as needed to keep a smooth finish.
The portable metal sawing machines described in this section are those lightweight and easily transportable saws that are used in a field or normal machine shop by maintenance personnel. These saws can be used to cut stock that is too big or too long to move to a maintenance shop to be cut. The following portable sawing machines are described in this section: the portable hacksawing machine, the portable band sawing machine, and the portable reciprocating saw. Two of these saws are operated by hand, so the quality of work depends upon the experience and skill of the operator. Portable metal sawing machines can be used in the maintenance shop to cut wood, steel, plastics, electrical conduit, tubing, pipes, and shop stock, and for auto body work.
The portable hacksawing machine (Figure 3-24) is not designed to be hand-held, but to lock onto the workpiece with a self-contained vise. This saw has a built-in electric motor that causes a power hacksaw blade to reciprocate at a fixed speed of 115 strokes per minute. The machine is capable of cutting solid steel 3 inches square and at an angle to 45°. This saw can be used in a horizontal, angular, or vertical position, having an adjustable counterbalance to compensate for operating the sawing machine in a vertical position. A 10-inch power hacksaw blade is used with this machine, producing a 4-inch stroke. A tension screw permits increasing or decreasing the blade pressure with each cut. The portable hacksawing machine will support itself when fastened very securely to a stationary workpiece, using the self-contained vise.
To operate the portable hacksawing machine, insert a power hacksaw blade of 18, 24, or 32 teeth per inch, depending on the material to be cut. Then, check the adjustment of the tension screw and the adjustment of the counterbalance lever. Turning the tension screw clockwise will increase the amount of lift the hacksaw blade makes on each return stroke and will increase the downward pressure of the blade on each cutting stroke. Counterclockwise rotation of the screw will decrease the lift and pressure. This control should be adjusted to cause the hacksaw blade to lift 1/8 inch on each return stroke to provide maximum cutting speed and efficiency. The counter balance lever controls the downward pressure exerted upon the hacksaw blade by the weight of the saw frame. By moving the counterbalance lever to the left, the pressure is decreased. Moving the lever to the right increases the pressure. Mount the workpiece squarely or angularly in the vise, depending on the type of cut desired. Start the sawing machine and observe the cutting action. If the machine strains, the blade pressure may be too heavy.
If the machine cuts very slowly, increase the pressure. Continuously check the power hacksaw blade for sharpness. If the blade is dull, it should be replaced. When the machine cuts completely through the material, the saw frame will fall and trip the motor switch, stopping the saw.
When the sawing machine is used in the vertical position, the counterbalance lever must be positioned in the farthest right notch of the guide bar ratchet to compensate for the lack of gravitational pressure normally applied to the blade by the saw frame. This practice should be attempted only if the workpiece can be clamped very securely in the vise and cannot be wrenched loose during vertical sawing, or damage to personnel or equipment could occur .
The portable band sawing machine (Figure 3-25) or portable band saw is a lightweight, hand-held unit powered by an electric motor. The saw motor and gears rotate a solid steel band saw blade around two large wheel pulleys and through several saw blade guides at such an angle to give clearance to the workpiece being cut. The portable band saw can cut steel round stock to 3 3/8 inch diameter or steel rectangular stock 3 3/8-inch thick by 4 1/8 inch wide. The portable metal band sawing blades are 44 7/8 inches long and can have from 6 to 24 teeth per inch, providing a wide range of cutting capabilities (see Table 3-3 in Appendix A). Single-speed band saw models are designed for softer metals, such as brass, aluminum, and mild steel. Two-speed and variable speed models can be switched to a low speed to cut harder metals, such as stainless steel or tungsten. The band saw blade is completely enclosed, using the motor housing as a blade guard, except for the exposed part of the blade that does the sawing. A hand grip and trigger switch are provided on one end of the saw and a knob grip is on the other end to provide for maximum control while sawing.
To start sawing, make sure that the material to be cut is held very securely in the vise to avoid excessive vibration. Select the appropriate blade for the material to be cut and mount the blade securely into the portable band saw in accordance with the manufacturer's instructions. Take hold of the front knob grip handle and rear hand grip handle and squeeze the trigger switch to start the saw blade in motion. Set the speed appropriately if operating a two-speed or variable-speed model. Gently lower the portable band saw onto the workpiece, being careful to use the weight of the machine as pressure to cut. If the operator uses additional pressure on the workpiece, the saw blade will slow down and reduce the cutting efficiency. Hold the machine steady and the saw blade straight to avoid twisting or breaking the blade. At the completion of the cut, do not allow the saw to fall onto the workpiece. Maintain hand control of the machine, release the trigger switch, and allow the blade to stop before setting down the saw. Never use a liquid coolant with the portable band sawing machine as this could damage the saw guide bearings or rubber pulleys. Lubricate and service each saw as specified in the manufacturer's instructions.
The portable reciprocating saw (Figure 3-26) is a hand-held lightweight machine tool that can be electrically or pneumatically powered, depending on the model selected. The saw motor and gearing cause a single knife-like blade to move rapidly in and out, sawing across a workpiece as hand pressure is applied. The saw may be a one-speed model or two speed model. The one-speed model operates at high speed only and is used for cutting soft materials like wood or sheet rock. The two-speed models have a switch that can move the speed from high speed to low speed, so that harder materials, such as metal pipes and steel sheets, can be cut.
The portable reciprocating saw, with the proper blade installed, can cut through steel stock up to 1 inch square or steel pipe up to 4 inches in diameter. An enclosed hand grip handle with trigger switch is provided at one end of the saw and another hand grip is toward the front of the saw, near the blade, to provide for maximum control while sawing. The blade freely protrudes from an angled work rest that is attached to the motor housing. There is no blade guard, so care must be exercised at all times.
To start sawing, ensure the material to be cut is held securely to avoid vibration that could break the saw blade. Select the right blade for the material to be cut and mount the blade into the blade clamp according to the manufacturer's instructions. Check the speed setting, get a firm grip on both handles, and squeeze the trigger switch. Guide the saw so that the work rest is against the workpiece and lower the saw until the blade starts cutting into the workpiece. Keep a firm grip through the saw cut and control the saw to avoid twisting or breaking the blade. After the cut is completed, maintain control of the saw and release the trigger switch. Allow the blade to come to a complete stop before laying the tool down. Periodically lubricate and service the portable reciprocating saw according to the manufacturer's instructions.
The portable metal cutting shears are lightweight, hand-held power tools used to cut through sheet metal. These shears are capable of continuous cutting along a straight or irregular line on a workpiece. Field and machine shop maintenance personnel use the portable metal cutting shears for sheet metal trimming, auto body work, duct work, aircraft structural repair, and cutting template patterns. These tools can be powered by an electric motor or air depending on the model selected.
There are two basic types of portable metal cutting shears: the heavy-duty type with the upper movable blade (single-cut) (Figure 3-27), and the light-duty type with the scissor action blade (doublecut) (Figure 3-28). Both types of shears work well, but there are slight differences in the operation and capabilities of each. Since these are hand controlled tools, the quality of work performed depends upon the experience and skill of the operator.
The heavy-duty portable metal cutting shears have an upper, movable shear blade that moves up and down very rapidly over a fixed lower blade so that a continuous single-cut action occurs. The single-cutting action of these shears can cause the sheet metal being cut to warp or bend, so these shears are not recommended for making precision templates or very flat sheet metal pieces. Some models of the very heavy-duty portable metal cutting shears can cut mild sheet steel up to #6 gage or about 3/16-inch, but most maintenance shops use the normal heavy-duty shears capable of cutting up to #12 gage (about 7/64-inch) or thinner. Softer metals can be slightly thicker than the rating for sheet metal and still be cut successfully. The heavy-duty type shear has a blade clearance adjustment so that the best cutting action can be obtained for each type and thickness of metal.
The light-duty portable metal cutting shears operate with a scissor-like motion that makes a double cut by removing a strip of metal about 1/4 inch wide which produces a distortion-free piece (Figure 3-29). These shears are used for thin sheet metal, such as #18 gage (about 3/64-inch) or thinner. A hole about 3/8 inch in diameter is needed to gain access for inside cutting. The rapidly reciprocating blade enables these shears to cut intricate patterns, make models, trim gaskets, and cut out templates from different sheet metal materials. These light-duty type of shears are lighter in weight and much easier to handle than the larger heavy-duty type. The cutting blade clearance is set at the factory, so the only adjustment is to sharpen the blades if the cutting action becomes difficult.
Successful operation of the portable metal cutting shears depends upon two important factors: sharp shear blades and proper shear blade clearance. The shear blades are easily taken out and sharpened or replaced as needed. Each model is slightly different, so follow the manufacturer's instructions on sharpening or changing the shear blades. When sharpening the shear blades, grind only the top and bottom edges. Never grind the sides of the blades.
If the metal being cut twists or jams beneath the blades, the most likely cause is excessive blade clearance. If the shears bind or stall when cutting through the metal, or if the blades tend to double shear and produce a burred edge, then the blade clearance is probably too small. Sharpen or replace the shear blades if the cutting action becomes slowed or stops, or if the workpiece edges become burred.
Before starting to cut, scribe a line on the workpiece. Holding the portable metal cutting shears in one hand, start cutting from the edge of the sheet metal while keeping the scribed line alongside the reciprocating blade. Only a light forward pressure is required to guide the shears through the metal. Any irregular contours can be followed quickly and easily because one blade is always visible to the operator. If the shear blades are sharp and the clearance for the blades is correct, a clean, smooth cutting action should occur.
The portable coolant attachment is a device for supplying coolants and cutting oils for cutting operations with machine tools when continuous application of a coolant or cutting oil is required. The portable coolant attachment consists of a container to hold the coolant or cutting oil, a pump to force the coolant through a flexible hose directed at the cutting tool and workpiece, and a pan arrangement beneath the machine tool to catch the coolant or cutting oil, filter it, and return it to the container.
The portable coolant attachment (Figure 3-30) is self-contained and powered by an electric motor. The coolant container and catch pans are attached to the bed or frame of the machine tool beneath the work area, and a flexible metal hose is positioned where the stream of coolant or cutting oil from the pump will flood the workpiece and cutting tool at their point of contact. The pans beneath the workpiece catch the coolant as it splashes from the workpiece and strain the coolant as it flows back to the container for recirculation. Coolant can be controlled by a valve at the base of the flexible hose. A pipe plug is provided at the base of the container to drain the coolant from the container after use. The portable coolant attachment moves easily from one machine to another to provide various machines with cooling capabilities.
The portable coolant attachment serves the needs of a machine shop in a field or regular maintenance facility. It provides coolant for lathes, mills, drilling machines, grinders, sawing machines, and other machine tools. The attachment should be set up under the area of the machine tool that does the cutting action and cutting oils for cutting operations with machine tools when continuous application and needs to be cooled. The drip or catch pans should be arranged horizontally to catch the coolant as it drips from the workpiece. Position the flexible hose so that it directs a stream of coolant to the point of contact between the cutting tool and the workpiece.
The portable coolant attachment is a device for supplying coolants of a coolant or cutting oil is required. The portable coolant attachment consists of a container to hold the coolant or cutting oil, a pump to force the coolant through a flexible hose directed at the cutting tool and workpiece, and a pan arrangement beneath the machine tool to catch the coolant or cutting oil, filter it, and return it to the container.
If the cutting tool moves along the workpiece, clip the hose end to the cutting tool carriage so that the hose will move with the tool.
The material to be machined will determine whether to use a coolant or a cutting oil. Fill the container of the portable coolant attachment with the selected coolant or cutting oil. Start the pump motor of the attachment before starting the machine tool to check the flow of coolant over the workpiece being machined, and adjust the stream flow as necessary. Start the machine tool and perform the cutting operation. At the conclusion of the operation, stop the pump motor. Drain the coolant or cutting oil from the container by removing the plug at the bottom of the container. Clean out the container, pump, and hose before using a different type of coolant.
Source: http://faculty.ksu.edu.sa/hossainy/Book1/Chapter%203.doc
Web site to visit: http://faculty.ksu.edu.sa/
Author of the text: indicated on the source document of the above text
If you are the author of the text above and you not agree to share your knowledge for teaching, research, scholarship (for fair use as indicated in the United States copyrigh low) please send us an e-mail and we will remove your text quickly. Fair use is a limitation and exception to the exclusive right granted by copyright law to the author of a creative work. In United States copyright law, fair use is a doctrine that permits limited use of copyrighted material without acquiring permission from the rights holders. Examples of fair use include commentary, search engines, criticism, news reporting, research, teaching, library archiving and scholarship. It provides for the legal, unlicensed citation or incorporation of copyrighted material in another author's work under a four-factor balancing test. (source: http://en.wikipedia.org/wiki/Fair_use)
The information of medicine and health contained in the site are of a general nature and purpose which is purely informative and for this reason may not replace in any case, the council of a doctor or a qualified entity legally to the profession.
The texts are the property of their respective authors and we thank them for giving us the opportunity to share for free to students, teachers and users of the Web their texts will used only for illustrative educational and scientific purposes only.
All the information in our site are given for nonprofit educational purposes