
Session 1: Introduction to Solidworks
Students will learn the basic functions of extrude, extrude cut, and fillet.
1) Complete Lesson 1 - Parts, from the Solidworks Tutorial.
2) Use the skills learned from the tutorial to draw a solid model of a duplex outlet cover.
a) Observe the dimensions of the duplex outlet cover plate. 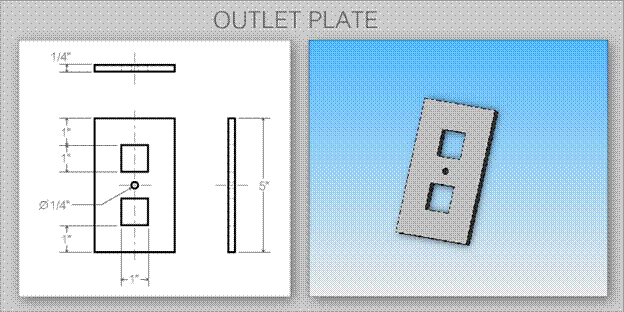
b) Review the cover and determine the CAD functions needed to create the solid model.
c) Design the solid model according to the specifications. Save the file as outletplate.
3) Draw a solid model of a light switch cover.
a) Observe the dimensions of the duplex outlet cover.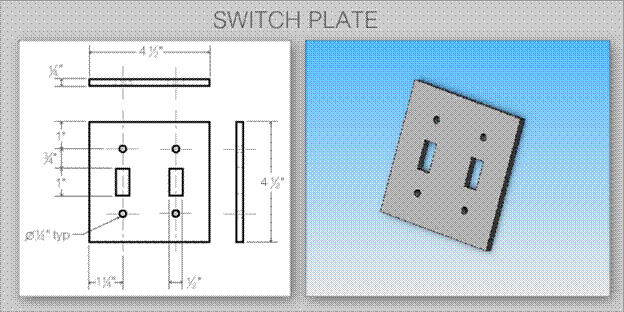
b) Create a solid model of the light switch cover. Save your file with the name switchplate.
Session 2: Assembly Basics
Students will learn shelling, advanced modeling, and the process of combining multiple parts together.
1) Complete Lesson 2 - Assemblies, from the Solidworks Tutorial.
2) Using the light switch cover from Session 1, design and model four identical fasteners to complete an assembly. The fastener design should adhere to the following criteria:
a) The fastener must be longer than the thickness of the switchplate.
b) The fastener must be 0.25 inch in diameter.
c) The head of the fastener must be larger than the hole in the light switch cover.
d) Save the model as fastener.
3) Assemble the four fasteners to the light switch cover. Save the file as switchplateassembly.
*Note: the format of the file should be .SLDASM
Session 3: Drawings
Students will learn how to represent 3D models as 2D drawings with dimensions.
1) Complete Lesson 3 - Drawings from the Solidworks Tutorial.
*Note: Please do not print the drawing.
2) The following exercise uses the model from the previous session to create a dimensioned drawing.
a) Create a new A-size ANSI standard drawing template.
b) Upload your Tutor2 model onto the template.
c) Create Front and Top views. Add an Isometric view.
d) Import the dimensions from the part. Add extra remaining dimensions.
e) Create a note on the drawing to label the wall thickness. (Wall Thickness=4 mm)
f) Save your file as tutor2drawing.
Session 4: Design Tables
Students will learn how to implement a table that effectively alters part dimensions.
1) Complete Design Tables from the Solidworks Tutorial.
*Note: Please do not delete your table as stated in the tutorial.
Session 5: Advanced Drawings
Students will learn how to diminsion different drawing views and annotate exploded drawings.
1) Complete Advanced Drawings from the Solidworks Tutorial.
*Note: Complete Creating Drawing Views and Assembly Drawing Views ONLY.
You do not need to work on the Detailing activity.
If you are having problems opening the file (foodprocessor.slddrw), then click here.
Go to S:\Solidworks Samples\Samples1\advdrawings to access motorcasing.sldasm
2) The following exercise uses a model created in Session 1:
a) Open switchplate and shell the part 0.1 inches. Add a front radius of 5 mm.
b) Create a new A-size ANSI standard drawing template.
c) Create a drawing for Switchplate.
d) Add two Detailed views with dimensions.
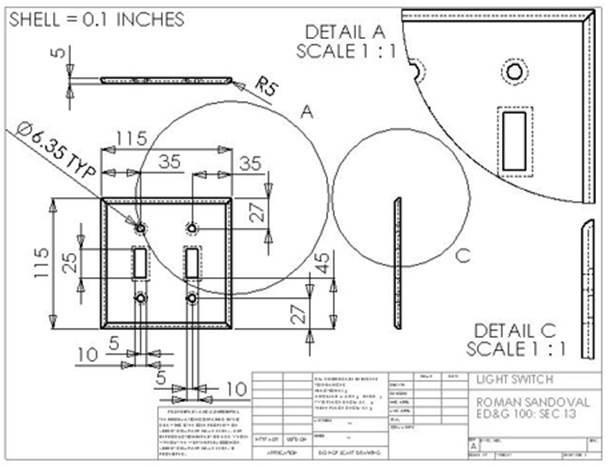
*This is a sample template. Disregard the dimension values.
Session 6: Revolves & Sweeps
Students will learn how to use the Revolve and Sweep tools.
1) Complete Revolves and Sweeps from the Solidworks Tutorial (Cstick.sldprt).
2) Create a Candle Stick that fits in the candle holder (save as Candle.sldprt).
a) Attempt to make the candle stick with a 30mm diameter.
b) Taper the bottom of the candle stick (use the extrude or chamfer tool).
c) Make sure you add a wick on the top of the candle (extrude a circle or use the sweep tool).
3) Assemble the candle with the candle holder (save as Cassembly.sldasm).
Session 7: Lofts
Students should be familiar with lofting, adding extra drawing planes, and shelling.
1) Complete Lofts from the Solidworks Tutorial.
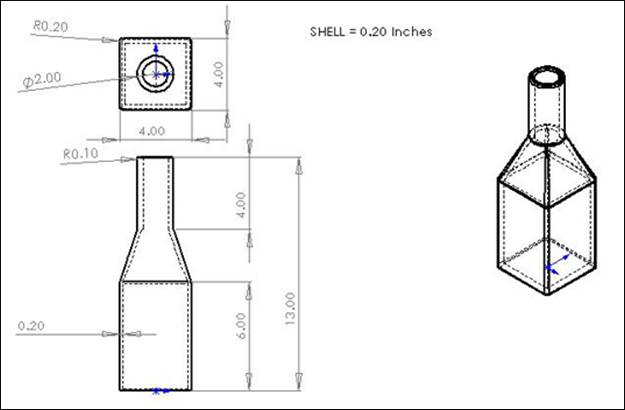
2) Create a bottle with the following dimensions:
Session 8: Assembly Mates
Students should be familiar with using assembly mates, exploding objects, and implementing movement control.
1) Complete Assembly Mates from the Solidworks Tutorial.
Source: http://www.engr.psu.edu/xinli/solidworks.doc
Web site to visit: http://www.engr.psu.edu
Author of the text: indicated on the source document of the above text
If you are the author of the text above and you not agree to share your knowledge for teaching, research, scholarship (for fair use as indicated in the United States copyrigh low) please send us an e-mail and we will remove your text quickly. Fair use is a limitation and exception to the exclusive right granted by copyright law to the author of a creative work. In United States copyright law, fair use is a doctrine that permits limited use of copyrighted material without acquiring permission from the rights holders. Examples of fair use include commentary, search engines, criticism, news reporting, research, teaching, library archiving and scholarship. It provides for the legal, unlicensed citation or incorporation of copyrighted material in another author's work under a four-factor balancing test. (source: http://en.wikipedia.org/wiki/Fair_use)
The information of medicine and health contained in the site are of a general nature and purpose which is purely informative and for this reason may not replace in any case, the council of a doctor or a qualified entity legally to the profession.
The texts are the property of their respective authors and we thank them for giving us the opportunity to share for free to students, teachers and users of the Web their texts will used only for illustrative educational and scientific purposes only.
All the information in our site are given for nonprofit educational purposes