Welcome to this section of your course which is designed to enable you the learner, understand how to select and install supplies for fixed appliances and socket outlets.
Objectives
By the end of this unit you will be able to:
- Recognise and use important electrical symbols
- Select the correct means of providing a supply for electrical appliances
- Select and install the correct cable and accessories for domestic socket circuits
- Select and install the correct cable and accessories for an immersion heater circuit
- Select and install the correct cable and accessories for a cooker circuit
- Select and install the correct cable and accessories for an instantaneous shower circuit
- Select and install the correct protective devices for all circuits above
- Calculate the volt drop and power loss in cables
- Calculate the running cost of fixed loads
Reasons
Understanding this information will allow you to read a drawing showing location of accessories for supplying fixed appliances and socket circuits in a domestic installation. You will be able to read a circuit diagram showing how to connect sockets and connection units in radial or ring configuration. You will also be able to read a circuit diagram showing how to connect an immersion heater, cooker and instantaneous electric shower.
Graphical Symbols
Architectural Symbols
Socket outlet ( power ), symbol |

|
Multiple socket outlet ( power ), three outlets shown |

|
Socket outlet ( power ) with single-pole switch |

|
Outlet with isolating transformer, for example:shaver outlet |

|
Water heater, shown with wiring |

|
Double Pole Switch |

|
Pull cord switch, double pole |

|
Circuit Symbols
Male plug |

|
Female socket |

|
Plug and socket |

|
Double Pole Switch |

|
Definitions
Portable Equipment: Equipment that is designed to be moved while in operation or moved easily from one place to another while connected to the supply.
Hand-Held Equipment: Portable equipment intended to be held in the hand during normal use, in which the motor, if any, forms an integral part of the equipment.
Stationary Equipment: Fixed equipment or equipment not provided with a carrying handle and having such a mass that it cannot easily be moved.
Example: The value of this mass is greater than 18Kg in standards relating to household appliances.
Fixed Equipment: Equipment fastened to a support or otherwise secured at a specific location.
Supply Point: A point at which electrical energy is delivered.
Origin of a Circuit: The point at which electrical energy is delivered to a circuit.
Radial Final Circuit: A final circuit that serves two or more points including socket-outlets.
Ring Final Circuit: A final circuit arranged in the form of a ring connected to a single point of supply.
Spur: A branch from a ring final circuit.
Isolating Transformer: A transformer, the input winding of which is electrically separated from the output winding by insulation at least equivalent to double insulation or reinforced insulation.
SELV: A voltage not exceeding 50 V a.c. or 120 V d.c. between conductors at any point of a circuit which is separated form circuits with higher voltages and from earth by insulation at least equivalent to that for Class II or which has equivalent protective means.
Sockets Outlets and Plugtops
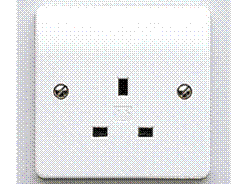
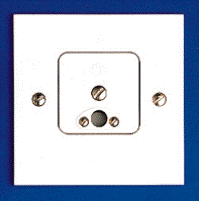
Figure 1 illustrates a 1 gang 13 A socket outlet. It is the type used in domestic premises, offices etc.
Figure 1.
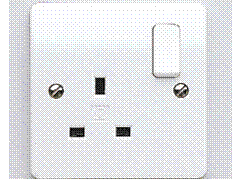
Figure 2 illustrates a 1 gang 13 A switched socket outlet. The switch avoids unnecessary wear on the socket as it can be switched off rather than unplugged.
Figure 2.
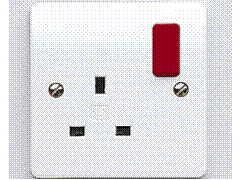
Figure 3 illustrates a 1 gang 13 A switched socket outlet with a neon indicator. The neon indicator glows to show that the switch is “on” and therefore power is applied to the appliance.
Figure 3.
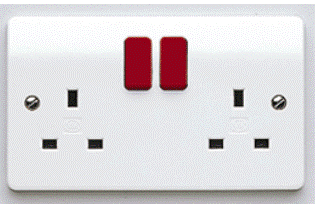
Figure 4 illustrates a 2 gang switched socket outlet with neon indicators.
Figure 4.
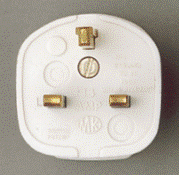
Figure 5 illustrates a 13 A rectanglar pin plug for use with the sockets previously mentioned. Commonly referred to as “flat pin” or “square pin”, it is a fused plug.
Fuse sizes available are 2 A, 3 A, 5 A, 7 A , 10 A and 13 A. The most commonly used sizes are 3 A, 5 A and 13 A.
Figure 5.
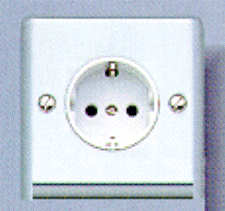
Figure 6 illustrates a 16 A two pin side earth socket. It is used in some continental countries and may be encountered in some old installations in Ireland.
Figure 6.
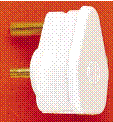
Figure 7 illustrates a 16 A two pin side earth plug, for use with the socket above. This plug is not fused.
Figure 7.
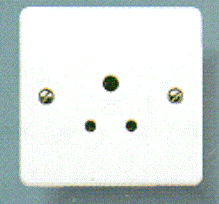
Figure 8 illustrates a 5 A round pin socket. It is the type permitted by the ETCI Rules for the connection of table lamps and standard lamps.
Figure 8.
Figure 9 illustrates a 5 A round pin plug for use with the socket above. This plug is not fused.
Figure 9.
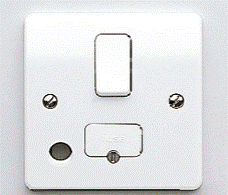
Connections Units
Figure 12 illustrates a 13 A fused connection unit with flex outlet in its base. A knockout is provided to allow the flex outlet be used if required.
Figure 12.
Figure 13 illustrates a 13 A fused connection unit with double pole switch and front flex outlet. It is used to supply permanently connected appliances and also provides a means of control.
Figure 13.
Figure 14 illustrates a 13 A fused connection unit with double pole switch which incorporates a neon indicator. As with the 13 A socket it provides visual indication that power is applied to the appliance.
Figure 14.
Figure 15 illustrates a 13 A fused connection unit with neon indicator and flex outlet. Unswitched units should be used where it is required that the appliance should not be accidentally switched off, e.g. alarm circuits and freezers.
Figure 15.
Socket Circuits
Socket outlets provide an easy and convenient method by which portable appliances may be connected to the electrical supply. Each appliance is equipped with a plug and a flexible cord which for safety reasons should not be longer than two metres. The plug is pressed into the socket outlet thereby connecting the appliance to the supply.
There are two types of socket outlet allowed by the ETCI Rules, for general indoor purposes. One of these, the most commonly used type, is the 13 A flat pin manufactured to IS 411 and BS 1363 standards. The other type is the 16 A two pin side earth socket, often referred to as the continental type.
Both types are available in flush and surface formats with or without an integral switch. They are designed to fit the standard single and twin socket boxes. These boxes are approximately 30 mm deep to accommodate the number and diameter of the cables which may have to be connected to the sockets.
Socket outlets should be mounted at a height between 400 mm and 1200 mm above finished floor level ( FFL ) The standard mounting height is 450 mm to the centre of the socket, except in premises used by the elderly or disabled, where this should be increased to 1100 mm. They should also be at least 100 mm above worktop level.
Sockets outlets in general must be protected by a Residual Current Device ( RCD ) having a sensitivity ( tripping current ) not exceeding 30 mA.
To avoid the possibility of loss of supply to a freezer when the RCD trips due to a fault on a socket circuit, the freezer may be connected as follows:
- A fixed outlet from a circuit not protected by an RCD.
- A dedicated socket-outlet circuit protected by its own separate RCD.
The 13 A plug and socket arrangement incorporates a number of safety features:
- The plug is fused and therefore offers better protection for the flexible cord to which it is attached. ( Fuse rating should match current rating of flexible cord ).
-
- The live and neutral pins of the plug are insulated for part of their length to avoid the possiblity of them being touched while plugging in or out.
-
- It is not possible to insert a plug so that a pin protrudes from the socket.
-
- The socket apertures are shuttered to prevent say, a child inserting small metallic objects, thereby receiving an electric shock. ( Some manufacturers are providing interlocked shutters on the live and neutral apertures ).
-
- Since the plug is fused it is possible to supply a relatively large number of sockets from one circuit, as protection is only required for the circuit conductors. Because all socket outlets will not be in use at the same time and the majority of them will be used to supply small loads such as table lamps, television, stereos, radios, etc. sockets should be installed as much for convenience as to supply specific appliances.
-
- The polarity of the socket must be as shown in Figure 16 when viewed from the front. The terminals are marked L, N and E on the rear of the socket.
-
Radial Final Circuit
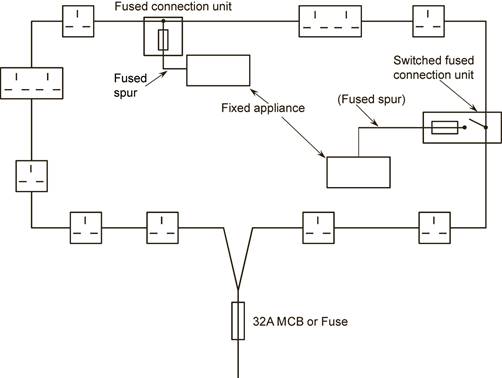
- In a radial final circuit supplying sockets, each socket outlet is fed via the previous one. Live is connected to live, neutral to neutral and earth to earth at each socket outlet. The cable used must be at least 2.5 mm2, and the maximum number of socket outlets per circuit is ten. The radial final circuit should not supply more than two rooms. A kitchen should be supplied by at least two radial circuits. The fuse or MCB size fitted to a radial final circuit should be a maximum of 20 A for 2.5 mm2 conductors. Figure 18 shows a block diagram for a radial final circuit supplying socket outlets.
-
-
- Figure 18.
-
-
- It is recommended that twin socket outlets be installed rather than single types as the initial cost is low in relation to having them replaced at a later date. This also helps avoid the use of double adaptors which are prone to overheating problems.
-
- The following are guidelines as to the recommended number of socket outlets per location in a typical domestic dwelling:
-
- Kitchen 10 Utility room 4
- Dining room 6 Sitting room 5
- Double bedroom 4 Single bedroom 3
- Hall 2 Landing 1
- Garage 4
-
The Ring Final Circuit
- Ring final circuits supplying sockets are very similar to radial final circuits, in that each socket outlet is fed from the previous one, but in ring final circuits the last socket is returned to the same three terminals in the distribution board.
-
- N.B. The same three terminals means, that the two ends of each conductor ( LNE ) must be clamped under the same terminal screw.
-
- Figure 19 shows a block diagram for a ring final circuit supplying socket circuits.
-
-
- Figure 19.
-
-
- The cable used must be capable of carrying 0.67 times the rated current of the protective device on the circuit. Normally this is 2.5mm2, which has a current carrying capacity of 23 Amps, when installed in normal domestic situations.
- Using the factor of 0.67 we can calculate the maximum load allowed on the circuit.
-
- Calculation:- Maximum load on cables 23 / 0.67 = 34.33 Amps.
-
-
- Alternatively:
-
- Given a protective device current rating, find the minimum Current Carrying Capacity of the cable required
-
- Calculation:- Minimum CCC of cable 32 x 0.67 = 21.44 Amps.
-
- An MCB with a rating of 32 Amps is fitted to ring final circuits in domestic installations. This provides protection for the 2.5 mm2 cables, the calculation is as shown above.
- A ring final circuit may supply an unlimited number of socket outlets, provided the area served is not greater than 100 square metres. Ring circuits should not be used in kitchens. If two or more ring circuits are to be installed, the socket outlets should be distributed evenly between them.
-
- A ring final circuit must remain unbroken throughout its length. If the conductors in a ring circuit are cut, then the terminations should be such that the electrical continuity of the ring remains as good, as if they were not cut.
-
- Ring circuits should be planned in such a way that all the outlets are included in the ring. In spite of this, circumstances will arise where it would not be practical to run two cables to a remote outlet. Also, it may be necessary to supply permanently connected appliances. In either case, a spur may be taken from the ring circuit.
-
- A spur is defined as “a branch connection from a ring final circuit”. All spurs must be fused.
-
- Spurs are used to supply permanently connected appliances. The fuse in the connection unit should be rated to suit the spur cable, e.g. a 1.5mm2 cable may be protected by a 5 Amp fuse.
-
- Figure 20 shows a typical ring final circuit with spurs connected.
-
-
- Figure 20.
Testing Socket Circuits
-
- A polarity test must be carried out on all socket circuits whether new or after an alteration has been made. This is to ensure that the phase, neutral and protective conductors are connected to the correct terminals in each socket.
-
- The test must be done with the supply DISCONNECTED. Testing may be carried out as follows:
-
- Remove circuit fuse or open MCB.
- Ensure that all appliances are unplugged or switched off.
- Connect one lead of the ohmmeter to the phase conductor in the distribution board as shown in Figure 21.
- Connect the other lead to the phase terminal in each socket in turn.
- A very low resistance reading should be found at each socket, indicating its polarity is correct.

-
- Figure 21.
-
- The polarity of the neutral and protective conductor should also be checked in the same manner.
Continuity of Ring Circuit Conductors
( Stage One )
-
- A ring circuit continuity test must be done to ensure that each phase, neutral and protective conductor is continuous and not broken at any point. If any conductor were broken then the load would not be properly shared by the conductors, possibly leaving one conductor overloaded and not adequately protected.
-
- The ring circuit continuity test may be carried out as shown in Figure 22. The six conductors are disconnected from their respective terminals and the continuity of each of the three “rings” is checked in turn.
-
-
- Readings 1 and 2 should be the same
- Example 0.3 Ohms, the resistance of 43 metres of 2.5 mm2 cable.
-
- The relationship between the resistance of 2.5 mm2 cable and 1.5 mm2 cable is 1.67.
-
- Reading 3 should be higher by a factor of 1.67.
- Example 0.3 x 1.67 = 0.5 Ohms, resistance of 43 metres of 1.5 mm2 cable.
Special Outlets
-
- Figure 23 illustrates a dual voltage shaver socket. It is the type required for use in bathrooms. It features a double wound safety isolating transformer, which is protected by a self-resetting thermal cut-out. The two socket outlets provide simple voltage selection
-
-
- Safety shutters are provided. They automatically switch on and off the supply to the double wound transformer. The shutters also prevent two shavers being plugged in at the same time, which would overload the transformer and possibly introduce danger.
-
-
- Figure 25 illustrates an outlet for connecting an electric clock to the supply. The outlet may be supplied via a lighting circuit or a socket circuit. The clock supply is usually fused at 2 Amps.
-
The Immersion Heater
- Hot water for domestic use may be provided in various ways:
-
- Solid fuel: Coal, turf, timber etc.
- Oil: Central heating boiler run on oil.
- Gas: Central heating boiler run on gas, gas powered water heaters.
- Electricity: Electrically powered water heaters, under sink and over sink types, cistern types and immersion types.
-
- The immersion type water heater is most commonly used, as it is easy to combine with the normal domestic hot water supply. Immersion heaters are available with one heating element or two separate heating elements. The latter is referred to as the Dual Immersion Heater. The dual immersion heater is the more commonly used type in this country. The heater is installed through a threaded flange in the top of the domestic hot water cylinder. See Figure 26.
-
-
- Figure 26.
-
- The short element heats about 10 gallons of water for normal sink or washbasin use.
- It is rated at approximately 2 kW.
-
- The long element heats about 30 gallons of water for baths and other heavy demands.
- It is rated at approximately 3 kW.
-
- Since hot water rises, the draw-off pipe is fitted at the top of the cylinder. Cold water enters at the bottom of the cylinder.
Element Construction
-
- The element of the dual immersion heater is composed of a nichrome spiral heater, surrounded by compacted magnesium oxide insulation. These are contained in a tubular sheath made of copper. The sheath may be nickel-plated to prevent corrosion of the copper. Electric kettle elements and cooker elements are constructed in the same manner.
- See Figure 27.
-
- Figure 27.
-
- When power is applied to the spiral heater it will heat to “red hot”. This heat must be dissipated efficiently; otherwise the nichrome wire will overheat and open circuit. This is often the result when an electric kettle is switched on while empty. The magnesium oxide insulation is a very efficient conductor of heat as is the copper sheath. The heat is therefore very efficiently conducted to the water in the cylinder.
-
-
Insulation against Heat Loss
-
- A lagging jacket fitted to the cylinder will greatly enhance the efficiency of an immersion heater. However, the terminal block of the immersion heater should not be covered, either by jacket or by clothing, as this may cause overheating of the terminals and cable.
-
Thermostat Construction and Operation
-
- For obvious reasons the temperature of the domestic hot water must be controlled and a simple thermostat provides this control.
- See Figure 28.
-
-
- This type of thermostat ( bi-metal ) depends for its operation on the different rate of expansion of an invar rod compared to a brass tube, which form the stem. At “switch-on”, when the water is cold, the contact is closed and current flows in the heating element. As the water temperature rises the brass tube expands more than the invar rod, which will cause the moving contact to be pulled away from the fixed contact, thereby breaking the circuit. The small permanent magnet causes the contact to make or break with a “snap action” in order to reduce arcing to a minimum. The temperature at which the thermostat operates is adjustable by means of the temperature control adjusting screw. Movement of this screw positions the “fixed contact” nearer to, or further from the “moving contact”. This in turn determines how soon a “break” or “make” is affected and therefore determines the temperature at which the thermostat operates.
-
-
Thermostat Differential
-
- There is a differential between the “break” and “make” temperatures of the thermostat of approximately 5-15°F ( 2-8°C ). This differential depends on the stem length and on the make of thermostat. It is usual practice to set this thermostat to 140°F ( 60°C ).
-
- The differential means that if the thermostat cuts out at 60°C, it will cut in again when the water cools down to between 52 and 58°C ( a difference of 2-8°C ). Conversely, if the thermostat cuts in at 60°C it will cut out again between 62 and 68°C.
Immersion Heater Control
-
- A heat resistant flexible cord is used to connect between control switch and the heater. The control switch must be connected to a separate final circuit. It should be wired in 2.5 mm2 cable and protected by a 30 mA RCD and a 16 to 20 A MCB or fuse.
-
- A time switch may also be fitted to provide hot water at pre-determined times during the day or night.
-
-
Connecting Single Immersion Heaters
-
- Single immersion heaters are controlled by a 20 A Double Pole switch.
- See Figures 29 and 30.
-
-
- Single Immersion Heater Circuit Diagram
-

-
- Figure 30.
Protection Against Overheating
Immersion heaters are now equipped with an over temperature cut-out. This is to prevent the water in the cylinder being overheated in the event of the control thermostat failing in the closed position. It is a manual reset type cut-out and is incorporated into the thermostat.
Any other form of heating incorporated in the system ( solid fuel, oil, gas, ) must be controlled to prevent overheating of the water as this would also operate the cut-out.
Dual immersion heaters
-
- Dual immersion heaters are controlled by a purpose-built switching unit. It consists of a 20 A Double-Pole switch and a 20 A Two-way switch. A neon lamp to indicate that power is applied to the heater, may also be included. In some cases the interconnection between the double-pole and two-way switch is not visible. See Figure 31
-
Single Stat Dual Immersion Heater Diagram
-
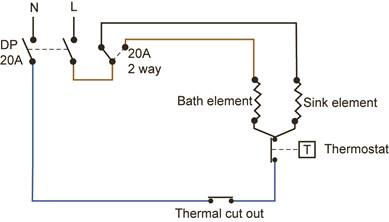
-
- Figure 32.
Dual Stat Dual Immersion Heater Diagram
-
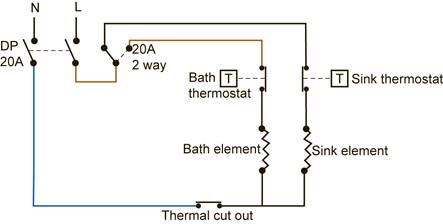
-
- Figure 33.
-
-
- Immersion Temperature Setting
-
- Fitted thermostats are pre-set to 70°C ( 168°F ), which should be satisfactory for most locations; however, adjustment is easily made as follows:
-
- Isolate the electrical supply.
- Remove the cover of the heater using a suitable tool.
- Adjust the thermostat to required setting using a small flat-blade screwdriver.
- Replace the cover being careful not to overtighten.
- Reconnect the mains supply.
- The thermostat should be set at 60°C ( 140°F ) for hard water areas,
- and up to 80°C ( 176°F ) for soft water areas. In a dual immersion heater, where both elements are controlled by one thermostat, after switching from “sink” to “bath”, having already heated water with the sink element, the thermostat may take a little time to operate the longer bath element. This is because the water temperature must drop a little in order to activate the thermostat.
- This reaction time may be speeded up, by drawing off a little water from a hot tap.
-
- Copper sheathed immersion heaters are suitable for use in normal water areas, and will give years of service when properly installed and maintained. In hard water areas, use an alloy sheathed immersion heater. Dual element heaters should be fitted vertically, while short, single element heaters may be fitted horizontally. The element must always be fully immersed in water when in use.
Installation Checklist
- Check that the voltage rating of the element corresponds with the available supply voltage and that the cable and switches used are of the correct rating for the load current. Heat resistant cable should be used to connect the heater to the electrical supply. A double pole switch must be used to isolate the heater from the supply.
- Check that the immersion heater used is of the correct length for the cylinder. When installed, the heater should not be in contact with the indirect heating coil, and should have a clearance of at least 50mm from the cylinder wall or base. ( Remember that in most domestic copper cylinders, the base is dome shaped ).
- Isolate the electrical circuit from the mains supply.
- Drain the cylinder until the water is below the spill level.
- Install the heater, using the joint washer supplied. The element is designed for a pressure gasket fit, and should not need the application of thread tape or jointing compound, provided that the mating flange is smooth and level and the flange threads are a proper fit.
- Connect the heater as per the wiring diagram and ensure that it has a proper earth connection.
- After installation, and before switching on the electrical supply, ensure that the cylinder is full of water and that the water system is functioning normally.
The Electric Cooker
- A basic domestic electric cooker consists of four boiling plates or rings, a grilling element and an oven. The controls for each element may be grouped together on a rear control panel or be situated on the front of the main cabinet. More expensive cookers usually have such features as, automatic oven timers, oven lights, rotisserie etc.
-
- To ascertain the total loading of an electric cooker, the loading of the individual elements, motors, lights etc. must be added. For example, the total load of a typical electric cooker is comprised of the following loads:
-
- Boiling Ring RH Rear 2000 W
- Boiling Ring RH Front 2000 W
- Boiling Ring LH Rear 2000 W
- Boiling Ring LH Front 2000 W
- Grill Element 1800 W
- Oven Element LH 1200 W
- Oven Element RH 1200 W
- Hot Cupboard Element 500 W
- Oven Lamp 40 W
-
- Total Load 12,740 W
-
-
-
- The full-load current of this cooker may now be calculated:
-
- Load in Watts
- Full Load Current = Rated Voltage
-
- 12740
- I = 230
-
- I = 55 Amps approximately
-
- However, diversity is allowed and should be assessed as follows:
-
- The first 10 Amps of the total rated current of the cooker, plus 30% of the remainder of the total rated current.
- First 10A = 10 A
-
- 30% 0f Remainder = (55 – 10) x 30% = 13.5 A
-
- Total = 10 + 13.5 = 23.5 A
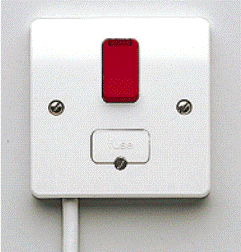
Cooker Installation
-
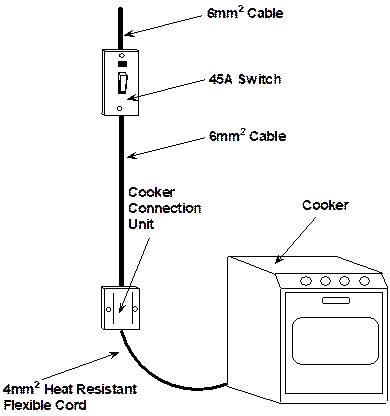
- A separate final circuit should be employed to supply a cooker. It should be connected to a separate way on the distribution board and terminated at a cooker switch. This switch should be a Double Pole type rated at a minimum of 45 A. The switch feeds a cooker connector unit, which may be made “live” even when not connected to a cooker. A heat-resistant flexible cord should be used to connect between the connector unit and the cooker. A cooker circuit is normally wired in 6 mm2 cable and 4 mm2 flex, protected by a 32 A MCB or fuse.
- See Figure 34.
-
-
- Figure 34.
-
- The cooker switch should be installed to one side of the selected cooker position. It should be not more than 2 metres from the cooker.
-
- The flexible cord from the cooker to the connector unit should be long enough to allow the appliance be moved out for cleaning and maintenance purposes.
Electrical Equipment in a Shower or Bathroom
There is an increased risk of electric shock in showers and bathrooms. This is due to the reduction in body resistance ( skin wet ) and the possibility of contact with earth potential. Items of electrical equipment installed in a shower or bathroom are treated as being within carefully defined zones.
The plan and side elevation of these zones are shown in the ETCI Rules.
There are four zones ( bear in mind that zone 0 is the first of the four zones):
- Zone 0
- Zone 1
- Zone 2
- Zone 3
In order that these zones are understood it is of great assistance if different coloured high-lighters are used to define the boundaries of each zone as shown in the ETCI Rules.
The items of electrical equipment which may be safely installed in each of the four zones are specified in the ETCI rules.
Instantaneous Electric Showers
An electric shower heats only the required amount of water, instantaneously. Energy is saved as hot water does not have to be stored. Taking a shower uses a lot less water than taking a bath. Electric showers are rated in kW’s. The higher the wattage, the better the performance of the shower. They are available in the following power ratings:-
7.5 kW, 8.0 kW, 8.5 kW, 9.0 kW, 9.5 kW, 10.0 kW and 10.5 kW.
Installation
Before installation commences it will be necessary for the electrician to assess several factors.
- The Power Rating, in order to decide on cable size. The following sizes of cables and equipment will normally be adequate.
For a shower unit up to 10 kW |
6 mm2 Copper |
For a shower unit over 10 kW |
Larger ratings will be required and these values should be carefully calculated |
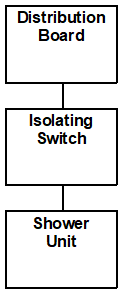
- The Location, in order to estimate the length of cable run. The cable run must be measured from the distribution board to the shower location, allowing for isolating switch ( usually located on the ceiling close to the shower ).
- The Earthing Arrangements, to ensure safe operation of the shower and protect against electric shock. Earthing and bonding must comply with ETCI Rules for locations containing a bath or shower.
- Cable and Personal Protection, to protect against overload, short circuit and earth fault. The circuit must include a 30 mA RCD, a 40 A FUSE / MCB and a 40 A / 45 A isolating switch. An RCBO may be used rather than a separate RCD and MCB.
- The CSA of the main supply cables, particularly if the shower is an alteration to an existing installation. This is to make sure they are adequate for the load. In some installations the DSO supply cables may not be adequate for the proposed load and it may be necessary to have them upgraded.
Isolation and Switching
An instantaneous electric shower must be fed via a separate radial circuit. This circuit must have a means of isolation and a means of interrupting the full load current of the unit.
It is recommended that this be achieved by a ceiling mounted pull-cord switch located near the shower, or a wall mounted switch outside the bathroom door. In either case it must be under the control of any person ( electrician or plumber ) who may have reason to open the unit for repair.
The switch should be a Double Pole type having contact separation of at least 3 mm when in the “OFF” position. Additionally, it must have reliable indication when the separating distance has been achieved. This latter requirement implies a mechanical indicator ( flag ) rather than a neon lamp, which cannot indicate the degree of separation.
All electrical controls must be inaccessible to a person using the shower with the exception of the following:
- Insulating cords of cord operated switches
- Controls of a suitable shower unit
See Figure 35
Figure 35.
Selection of Cable Sizes
When selecting a cable for a given load, it is necessary to ensure that it will carry the required current without overheating. Also, the voltage drop between the supply position and the terminals of the load, should not exceed 4% of the nominal supply voltage.
The cable conductor has a certain value of resistance which depends on the following:
- Conductor material ( resistivity )
- Conductor length
- Conductor size ( cross sectional area )
e.g. the resistance of 100 metres of 2.5 mm2 copper conductor is approximately 0.7 Ohms.
If the conductor length is increased its resistance will increase and vice-versa. In other words, conductor resistance is directly proportional to conductor length. If the conductor size ( CSA ) is increased its resistance will decrease and vice-versa. In other words, conductor resistance is inversely proportional to its size ( CSA ).
The latter is the main reason for the variety of conductor sizes in use.
There are other factors involved in the selection of cables and these will be covered in Module 2.3.4.
Voltage Drop across Cables
As every cable conductor has resistance ( however low ), there will be a voltage drop across them due to the current flowing through their resistance. If this voltage drop is excessive, the “potential difference” across the load will be low and inefficient operation may be the result.
Since any voltage drop can be expressed as the product of current and resistance
( U = I x R ), voltage drop across a cable depends on the resistance of the conductor and the value of current flowing through it.
- Voltage drop is directly proportional to conductor length
- Voltage drop is directly proportional to the current flowing through the conductor
The voltage drop across a cable supplying a given load, can only be reduced by replacing it with a cable having a larger cross sectional area. This is the main reason for using different sizes of cables e.g.
- 1.5 mm2 for lighting loads
- 2.5 mm2 for heating loads
- 6 mm2 for cooking loads
According to the ETCI Rules the maximum permissable voltage drop allowed is 4% of the nominal supply voltage e.g. 4% of 230 Volts is 9.2 Volts.
This means that the voltage at the terminals of the load should be, not less than 230 Volts minus 9.2 Volts which equals 220.8 Volts.
The following is an example of a basic voltage drop calculation:
Refer to Figure 36. Assume a load of 20 Amps is to be supplied at a distance of 25 metres using 2.5 mm2 conductors.
Figure 36
The resistance of 50 metres ( phase and neutral in series ) of 2.5 mm2 must first be established.
Resistance of conductor
rl
 R = R =
a |
r for copper is 17.2 mWmm ( 17.2 x 10⁻⁶Wmm )
l is 50 metres ( 50 x 103 mm )
a is 2.5 mm2 ( 2.5 mm2 ) |
17.2 x 10-6 x 50 x 103
 R =
R =
2.5
17.2 x 10-3 x 50
 R =
R =
2.5
R = 17.2 x 10-3 x 20
R = 344 x 10-3
R = 0.344 Ohms
The voltage drop across the cable can now be found as follows:
Voltage Drop across Cable VD = IR |
VD = 20 x 0.344
VD = 6.88 Volts
This figure is less than the maximum of 9.2 Volts and so the cable is suitable for the load.
The ETCI Rules provide figures to aid the above calculation and also take into account other factors, which affect the current carrying capacity of cables. These figures are also more accurate as they take into account cable reactance as well as resistance.
Power Dissipated by Cables
Current flowing through a resistor produces heat. This heat must be dissipated by the resistor. Because of conductor resistance, heat is also produced in cables. This heat will have an effect on the cable insulation, and if excessive will result in damage to the cable.
Power is a product of current squared and resistance.
P = I2R
Applying this formula to the previous situation the power dissipated in the cable is calculated as follows:
P = I2R I = 20 A. R = 0.344 Ohms.
P = 202 x 0.344
P = 137.6 Watts
This amount of power is given off by the cable concerned in the form of heat, and can be considered to be power wasted. This wasted power must be paid for and therefore it is worth keeping it to a minimum.